
In case you want to publish your panoramic work on Mountainpanoramas, dare it! I promise to use your work solely for publishing on Mountainpanoramas.
Publishing a panorama on Mountainpanoramas is not possible through self-service. Due to quality reasons I check and publish each panorama manually. Send me your image file by email (when less than 20MB) or ask me for an FTP or WebDAV account for upload. Contact data is shown in the box on the right hand side, information on image formats in the article below.
Here is my contact data for publishing:
Thomas Worbs
Phone: +49 89 57004563
Fax: +49 89 57004309
E-mail: tw@mountainpanoramas.com
Publishing on Mountainpanoramas is possible in three projection formats:
- spherical,
- cylindrical or,
- cubefaces.
Spherical (equiractangular) format is the preferred projection for 180x360 and partial panoramas as this projection provides the best loading and movement performance in the Mountainpanoramas player.
On Montainpanoramas 360 degree as well as partial panoramas are welcome. There are only a few restrictions regarding resolution in order to provide a proper quality:
- Minimum resolution for 360x180 spherical panoramas: 6000x3000 pixel
- Minimum height for partial panoramas: 1200 pixel
- Minimum width for partial panoramas: 5000 pixel
There is no upper limit for the resolution as the technology used divides the images in resolution stages that are dynamically selected depending on the current zoom level.
The preferred image file formats all 16 bit formats like TIFF, Photoshop PSD or PSB. Preparing your work in 16 bit avoids ugly staged color gradients especially in the sky areas of your panoramas. But also all 8 bit formats like JPEG can be processed.
The panorama player used in Mountainpanoramas sharpens the images automatically. Please do not apply too much sharpness filters before in order to avoid artefacts at the contrast borders like mountain-sky-borders.
Please include the color profile in your image file for correct color interpretation. I prefer the AdobeRGB or the ECI-RGB profiles as they provide a sufficient color space in the blue region. Anyway, as most cameras produce sRGB profiled pictures, this profile is OK also.
Perhaps you have noticed that all panoramas on Mountainpanoramas are correctly aligned regarding point of the compass. This feature needs a little preparation work from your side. For 360 degree panoramas the leftmost pixel should be exactly South, the middle of the image exactly North. For horizontally partial panoramas I require the HFOV (Horizontal Field of View) and the compass direction of the leftmost pixel.
Roland and I developed a method and an Excel tool to align panoramic images. In case you want to use this tool, please request it by email, I'll send it to you together with the instructions. If you need support, I can assist you in aligning your first panorama.
The panoramic images are published together with some metadata in the footer as you might have recognized. I prepared an Excel template where you can enter this metadata and then send it back to me together with the image. Click here to download.
As soon as the panorama is published on Mountainpanoramas you can start to create and edit the labels within your browser. Here is a little step by step user manual for the Label Editor.
 Step 1: Open the Panorama in your Browser
Open the panorama by clicking on the panorama box on the Panoramics Page, on the map marker within the Panorama Locator on the Home Page, or on the map marker on the Map Page.
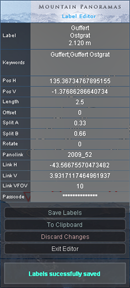
Click into the panorama image in order to set the input focus there. Now type 'E' on your keyboard. The Label Editor Box (see left) appears on the right side of the panorama.
Now click into the Passcode field in the Label Editor Box and enter the Passcode I have sent to you. Be aware that this Passcode is case-sensitive. It is important that you enter the Passcode before any other action. You can check your passcode being correct by creating a new label. A read arrow indicates that your passcode has been accepted. A grey colored arrow indicates that your passcode is invalid. Please delete grey labels and re-enter after having typed in the correct passcode.
Creating Labels is very simple. Move the round cursor to the place in the panorama where you want to place the arrow tip of the label and press 'N' or 'INS' on your keyboard. A new label will appear ready for further editing. If you encounter a grey arrow with the label, delete it ('DEL' key on the keyboard), re-enter the correct Passcode, and create the Label again. There went something wrong with the Passcode.
Now the label is selected (indicated by the white-filled arrow) and you can edit the label's properties in the Label Editor Box. First of all enter the label text into the field Label. Please regard the Label Policies shown in the rightmost column of this page.
While entering the label text the keywords in the field Keywords are automatically updated. You might have to refine the keywords now according to the Keywords Policies explained in the right column of this page. Please take the keywords editing for serious, otherwise it will not be possible to create a proper mountain index (planned for a future version of Mountainpanoramas).
The fields Pos H and Pos V contain the horizontal and vertical position of the label's arrow tip in the panorama (angle in degrees, panorama coordinates, not geographical coordinates). Please do not alter manually, these fields are automatically updated when dragging the label with the mouse.
Now you can adjust the graphical outfit of the label. In the field Length you can enter the line length. Negative values lat the label text appear below the label. The number in the field Offset determines the horizontal offset of the text compared to the arrow. When there is a value not zero in this field, the line is broken into three pieces, two vertical ones at the arrow and the text side and a connection line in the middle. By altering the values in the fields Split A and Split B you can shift the line connection points to a convenient position (A is the arrow side and B is the text side, value range 0..1).
Entering a value in the field Rotation lets the label text rotate between 0 and 90 degrees. See Label Policies in the right column of this page for correct use of rotated labels (54° is the default rotation on rotated label texts).
The remaining fields are for linking the labels with other panoramas. A documentation will come soon.
In case you want to correct a label's position or other parameters of the label, just click on the label. Now the label becomes selected showing a white fill inside the arrow. Don't forget to enter your Passcode before, otherwise this will not work.
After selection the Label Editor Box shows all label parameters for editing. In order to change the label position interactively, move the mouse cursor over the label, press down the left mouse button and keep it down while moving the label to its new position.
When you want to delete a label, just select it and press the 'DEL' key on your keyboard.
The label editor is a browser-based web application. for those Applications you need to explicitly save your work before you leave the page ore close your browser window. In case you forget it, your work will be gone. Press the button Save Labels before Exit Editor or before you close the browser window or before you navigate to another web page.
These label policies shall give you as an panorama author some hints how to create a good look and feel of the labels in the panoramics. The policies shall also help to provide a unique style of labeling on the whole Mountainpanoramas portal.
The keyword policies are necessary for a planned feature of Mountainpanoramas, the index. I plan to publish an alphabetical index of all labelled points in the panoramas serving as a mountain dictionary. For this purpose accurate keywords are a necessary prerequisite.
The arrows of the labels should be placed
- horizontally in the middle of the labelled object,
- with a small visible distance between the object and the arrow tip even when completely zoomed out.
For the general positioning of the labels please regard the following rules:
- Lines and label text shall not overlap with any other label part (use the horizontal offset features in the label editor to avoid),
- only label arrows may overlap when the labelled points are tight together,
- labels for mountains should be generally in the sky regions of the panorama except the line would become too long (> 10 units) or sufficient space is missing there,
- do not cover interesting regions of the panoramic image by label elements.
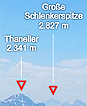 The preferred label text design is depicted in
the sample at the left side.
The preferred label text design is depicted in
the sample at the left side.
- The label text should be oriented horizontally wherever there is enough space for it, because this is easy to read.
- The name of the summit or other geographical point should be at the beginning. if necessary it can be split into two ore more lines.
- The elevation in meters should be given wherever possible in a separate line when the text is in horizontal direction.
- Please insert a separating dot for the 1.000-digit and a blank before the 'm' for meter.
- if there is a common alternative name for a mountain or geographical point, please state it in round brackets.
- In case you want to state the distance of the mountain (only applicable for extraordinary far away objects), please state the distance in kilometers in square brackets like this [192 km] after the elevation in a separate line.
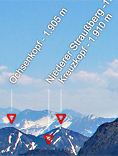 When there is not enough space for horizontally oriented label
text please stick to the following policies (example see left):
When there is not enough space for horizontally oriented label
text please stick to the following policies (example see left):
- The text rotation should be 54 degrees, because this looks good. Please do not use a different angle.
- All text including elevation and distance should be in one line.
- Separate the elevation with a minus sign including a space before and after the minus sign.
- Alternate names (in round brackets) or distances (in square brackets) should be also separated by space characters from other text.
- The sequence should always be: name (alternative name) - elevation m [distance km]
Please enter all names of the mountain or geographical point labeled into the Keywords field of the Panorama Editor Box. Separate the names by semicolon.
Typically there are different names in different languages, e.g. Vertainspitze and Cima Vertana. Please list all common names for a geographical point in the Keywords field separated with a semicolon ';'. In the abovementioned case the Keywords entry should look like Vertainspitze;Cima Vertana. Between the names and the semicolon no space charactes are allowed. Sometimes mountains have different name flavours in the same language, e.g. Brecherspitz and Brecherspitze. Please also enter all flovours in the Keywords field, e.g. Brecherspitz;Brecherspitze.
When changing an existing label name, the keywords are not updated automatically. Please check each time and update the keywords manually.
Thanks!